You’ve got to fail till you succeed!
Try => Fail => Learn

You’ve got to fail till you succeed!
I worked as a backend-focused software engineer before moving into machine learning, where most solutions were just math functions—not what we think of as AI today. Now, I’m focused on AI-driven solutions that go beyond traditional ML.
To push this forward, I founded LedgerWise.ai, transforming how businesses service debt with AI-powered automation. I also joined macrovo.com to develop AI systems that enhance human intelligence and decision-making at scale.
AI isn’t just a tool—it’s a force multiplier. It’s not about replacing people but augmenting expertise and solving problems at scale.
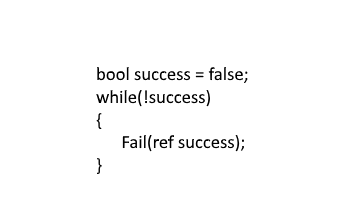
One of those problems? Reading thousands of lines of PHP code when I didn’t know PHP.
I needed to analyze an old, well-documented PHP system, but I wasn’t familiar with PHP or how the documentation was structured. The codebase was also far too large to paste into ChatGPT or Claude.
Instead of manually searching for answers, I built an agentic workflow to do it for me.
Once the agent was running, it answered deep questions, summarized API routes, and explained logic. It didn’t just help—it did the knowledge work for me. Instead of learning PHP, I wrote Python that learned PHP for me.
AI didn’t replace me. I still had to write the code that let the AI process and analyze the PHP system.
The hardest part of this project wasn’t PHP—it was getting the AI tooling to work.
This is a temporary problem—AI tooling will stabilize as the space matures. But for now, building with AI means constant adaptation.
This project reinforced that AI isn’t replacing engineers—it’s changing how we work.
We are becoming AI system architects, designing workflows that do the heavy lifting for us.
This project solidified why I’m focused on AI-driven companies. At LedgerWise.ai, we’re transforming how businesses service debt with automation. At macrovo.com, we’re developing AI systems that enhance decision-making at scale. AI is changing everything, and those who embrace it now will be ahead of the curve.
If AI can turn me into a PHP expert overnight, what else can it do?
Now’s the time to start building.
Disclaimer: This blog post was written with the assistance of AI to refine structure, improve clarity, and enhance readability. All thoughts and experiences shared are my own.
Code: github.com
I found a really cheap, really old mac mini. So old that it was outside Apple’s period to update the software and decided to throw some Linux on that bitch and then get containerizing!
**I tried installing docker on the mac as is and also forcing it to upgrade but those options did not work well at all. I strongly encourage you throw some linux around if you want to easily extend the life of your old mac hardware. If you are curious which distro I went with, it was ubuntu.
After installing Docker it was pretty straight forward in getting pi-hole running. Below is the script I ran to start it.
docker run -d \
    --name pihole \
    --restart unless-stopped \
    -e TZ="America/Los_Angeles" \
    -e WEBPASSWORD="UrAmazingAndWonderful" \
    -v "$(pwd)/pihole/etc:/etc/pihole" \
    -v "$(pwd)/pihole/dnsmasq.d:/etc/dnsmasq.d" \
    -p 8081:80 \
    -p 53:53/tcp \
    -p 53:53/udp \
    pihole/pihole:latest
A couple things to point out here:
Hey Future Me,
After hours and hours of broken internet access we finally got the DNS server up and running consistently for days now! This process was very difficult due to the nature of this network change. When flipping the switch to turn this on if we didn’t get it exactly right then internet no longer works making google queries to troubleshoot issues impossible. After a combination of countless articles on DNSMASQ and me poking the conf file I have finally managed to make it work.
love,
past you!
What I wanted to accomplish was:
**Static IP is not something that requires a dnsmasq server and if you have a router that supports DNS configuration or if it is flash-able with DD-WRT it would also get all this functionality without having to create a separate server. If you are wondering why I went through all this trouble it is because my router is not a DD-WRT flash-able router and I found 4 raspberry pi’s laying around that didn’t have a purpose. Also I like the idea of having a S.O.C. architecture using pi’s as they can be written to a file, saved and recreated in a few minutes. As for the remaining three raspberry pi’s I am still deciding on a use but I am playing around with the idea of using them to compute the meaning of life and perhaps even create a super intelligent sentient being to prove humans aren’t all what their cracked up to be but I will save that for another blog post.
This will change the name seen on the network for the device. In my case I chose to use DNSMASQ as the name instead of the default of “raspberrypi”. There is a really good article on how to do this here: Changing Host Name
There is an article on this as well which you will find here. Follow the instructions as stated with the following changes:
static domain_name_servers=192.168.0.1static routers=192.168.0.1 to whatever your routers current IP is most likely either 192.168.1.1 or 192.168.0.1. In my case it was 192.168.1.1.Run the following command to install dnsmasq on your pi.
apt-get install dnsmasq
This is were things can get really hairy. Like any software every made the configuration allows for you to do anything and everything in an infinite number of combinations. That being said I carefully documented all the changes I needed after every “poke” of the config file that I took. This was extremely time consuming but resulted in a much better understanding of what different settings do. I now know that when the explanations for such config values describe words that I do not understand it means it will break my network if I change it because I have no idea what I am doing. I also suggest you rename the existing config file using the below and then start with a blank one.
sudo mv /etc/dnsmasq.conf /etc/dnsmasq.conf.old
sudo nano /etc/dnsmasq.conf
Below is an exact copy of my conf file:
#BEGIN JORDANG

#This tells DNSMASQ to send any queries it does not already know to 8.8.8.8

server=8.8.8.8

#This tells DNSMASQ to send any queries it does not already know to 8.8.4.4

server=8.8.4.4

#Size of cache in KB

cache-size=4096

#Must be present and match domain and have the two slashes

local=/jordang.net/

#Expands the hosts when an entry comes in without a fully qualified domain name

#e.g. winbeast would get translated to winbeast.jordang.net

expand-hosts

#The domain the DNSMASQ represents internally to all the machines that query it

domain=jordang.net

#This is the range of the IP addresses it is allowed to get out,

#along with a sub net mask and a lease of 14 days per client

dhcp-range=192.168.1.3,192.168.1.254,255.255.255.0,14d

#This option is for windows 7/Vista/XP to fix a known issue with them

dhcp-options=252,"\n"

#Tell dnsmasq to log to this file

log-facility=/var/log/dnsmasq.log

#Forces dnsmasq to log async when able to not slow queries

log-async

#Will log all dhcp requests e.g. any ip addresses it hands out

#can be commented out when this is working

log-dhcp

#Logs the DNS request which includes the client that asked, the DNS name, and the #IP address that was returned can be commented out when this is working

log-queries

#This says when a host connects who says its name is WINBEAST then give it this ip #address and allow the client to have the ip address indefinitley

dhcp-host=WINBEAST,192.168.1.5,infinite

#END JORDANG
This part depends on your router. My router had an advanced section where I could turn off the DHCP server and let it be handled by another component on the network. This is where you are setting the bridge on fire before you start crossing it. Try not to plummet to your death.
After the DHCP server is turned off things will start to disconnect but will hopefully reconnect and everything will be magical and perfect. As a debugging measure run the following command on the pi locally. This will display lines being appended to the log on the console so you can monitor what your DNSMASQ is doing.
sudo tail -f /var/log/dnsmasq.log
On a windows machine run the following command in a command prompt with administrator privileges:
ipconfig /release
This causes the computer to try and renew it’s lease on the IP address it is on. This will hopefully hit the new DNSMASQ server after the router responds with “I cannot help you”. On my machine I got a notification that there was a network connection but no internet access and to let windows troubleshooter try to fix it. The trouble shooter reset the network adapter which then forced it to the correct IP and all was working.
On a windows machine you can verify that all is working by running the following command in the command prompt.
ipconfig /all
This should display among other things the DNS suffix which we set in the DNSMASQ’s conf file for domain(jordang.net), the DNSMASQ server IP address which we set to in the pi’s dhcpcd.conf file as a static IP (192.168.1.2), and the Default gateway which would of been the IP of our router(192.168.1.1). You should also be able to address any device on the network with its name as opposed to its IP address. Assuming all is well go into your dnsmasq.conf file located in /etc/ on your pi and remove the lines for logging so that you do not bog down your pi with frivolous logging that is no longer helpful.
ifconfig /allstatic domain_name_servers from your dhcpcd.conf file when setting the host name and static IP or that you didn’t setup the dhcpcd.conf file at all giving your device a static IP address. See step 2.ping google.comstatic domain_name_servers being set from the tutorial I mentioned previously. See step 2.sudo service dnsmasq restart